Quick Start Installation
- Windows
- Linux
- Docker
Windows Installation
Prerequisites
- Windows
- Windows 10 Enterprise or later, Windows Server 2016 or later
- Windows user account with "Run as Administrator" privileges
- 64-bit processor, 2.90GHz
- 8 GB Installed memory (RAM)
- DataConnect Cloud or Avalanche Subscription
What Will be Installed
- Actian Integration Agent (Windows Service)
- DataConnect v12 Embedded Engine
- AdoptJDK 11 Embedded JRE
Download
You can download the Actian Integration Agent installer from either the Agents and Devices page in Integration Manager or Actian ESD:
From Integration Manager:
-
Open Integration Manager at https://console.im.actiandatacloud.com/ui/agents.
-
Select the Agents tab.
-
Click the Download Agent dropdown and select your platform:

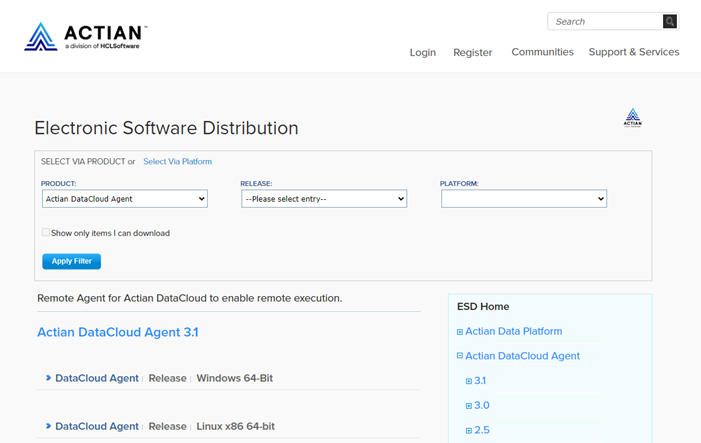
From Actian ESD:
-
Go to https://esd.actian.com/, select Actian DataCloud Agent.
-
Click DataCloud Agent for your platform and click Download.
Installation
- Right-click the downloaded installer file (
integration-agent-xxx-win.exe) and select "Run as administrator". - If you have a previous 3.x.x version installed, you will be prompted to uninstall first. Uninstall will shutdown running services and prepare for library updates, it will NOT remove or alter ProgramData (conf files, logs, etc.).
- Accept the License Agreement.
- Select the installation path (default:
C:\Program Files\Actian\IntegrationAgent). - Select the shared data path (default:
C:\ProgramData\Actian\IntegrationAgent). - Installation should take less than a minute.
Registration
-
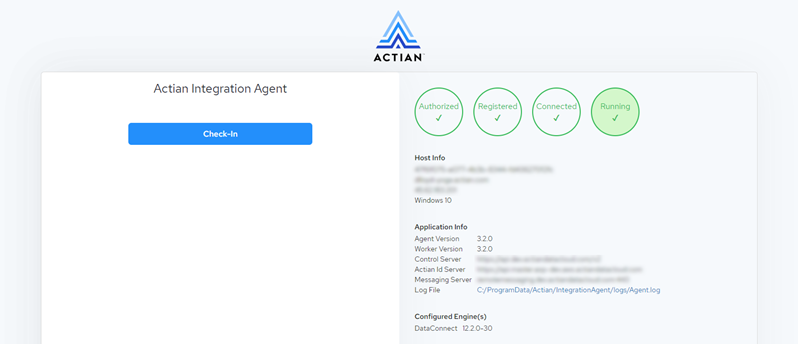
If installed locally, open http://localhost:6001/home. If installed on a network server, open http://[agent hostname]:6001/home.
-
Register the Agent using your DataConnect Cloud or Avalanche credentials. Registration progress will be shown to confirm that your Agent is operational.
 note
noteYou can open http://localhost:6001/home at any time to confirm the status of the Agent on the installed machine. Clicking the Check-in button updates the Last Check-In time on the Agents tab in Integration Manager.
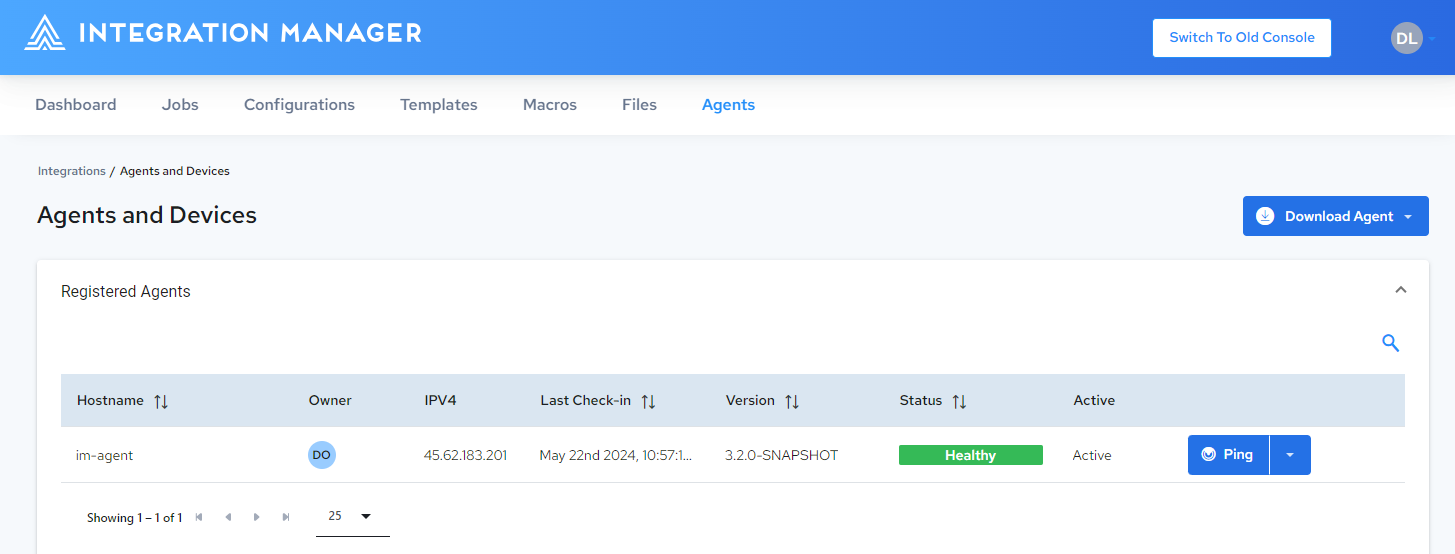
-
You should now be able to view and manage your Agent from the cloud on the Agents tab in Integration Manager:
If you encounter issues, try the following:
- Make sure the agent has been activated. See Managing Agents and Devices.
- Go to Windows → Administrative Tools → Services and ensure that the Integration Agent service is running.
- Refer to Agent Troubleshooting.
Run Your First DJAR
You are now ready to run your first remote job. Refer to Run Your First Remote Job.
Service Logs & Monitoring
-
You can monitor Agent health, location, and job history from the cloud:
- DataConnect Cloud: https://console.im.actiandatacloud.com/ui/agents
- Avalanche Console: https://avalanche.actiandatacloud.com/im/agents
- Private Cloud on Kubernetes: https://[your hosted domain]/ui/agents
noteFor more information on managing agents and devices from the Integration Manager, see Managing Agents and Devices.
-
You can monitor service activity and get important additional information from the log file on the Agent machine (default:
C:\ProgramData\Actian\IntegrationAgent\logs\Agent.log)
Uninstalling
To uninstall Actian Integration Agent from your Windows machine, simply run the installer .exe file and click Yes:
Log file data will survive uninstallation/reinstallation.
Linux Installation
Prerequisites
- Linux
- Red Hat Enterprise Linux 7.9 and 8 (64-bit U.S. English edition)
- GTK Version 3
- You need to install libnsl.so.1 separately on RHEL 8.1 or above versions.
- Linux user account with sudo privileges
- 64-bit processor, 2.90GHz
- 8 GB Installed memory (RAM)
- DataConnect v12 License file (typically *.slc)
What Will Be Installed
- Actian Integration Agent (Linux Daemon)
- DataConnect v12 Embedded Engine
- AdoptJDK 11 Embedded JRE
Download
You can download the Actian Integration Agent installer from either the Agents and Devices page in Integration Manager or Actian ESD:
From Integration Manager:
-
Open Integration Manager at https://console.im.actiandatacloud.com/ui/agents.
-
Select the Agents tab.
-
Click the Download Agent dropdown and select your platform:

From Actian ESD:
-
Go to https://esd.actian.com/, select Actian DataCloud Agent.
-
Click DataCloud Agent for your platform and click Download.

Installation
- Locate the downloaded rpm file (
integration-agent-3.x.x.noarch.rpm). - Switch to root user:
sudo su - The libnsl library required by DataConnect was removed from the base install of RedHat starting with RedHat 8.1. If you are running a version of RedHat or Amazon Linux that does not include the libnsl library, run the following command:
yum install libnsl. - Install rpm with yum:
yum install integration-agent-3.x.x.noarch.rpm - Confirm the installation path (default:
/opt/actian/integration-agent). - Confirm the shared data path (default:
/etc/opt/actian/integration-agent)). - Installation should take less than a minute.
Registration
-
If installed locally, open http://localhost:6001/home. If installed on a network server, open http://[agent hostname]:6001/home.
-
Register the Agent using your DataConnect Cloud or Avalanche credentials. Registration progress will be shown to confirm that your Agent is operational.
 note
noteYou can open http://localhost:6001/home at any time to confirm the status of the Agent on the installed machine. Clicking the Check-in button updates the Last Check-In time on the Agents tab in Integration Manager.
-
You should now be able to view and manage your Agent from the cloud on the Agents tab in Integration Manager:

See Service Logs & Monitoring below.
If you encounter issues, activate the agent. See Managing Agents and Devices. If the issue doesn’t resolve, ensure that the service is running. See Start/Stop/Status.
Run Your First DJAR
You are now ready to run your first remote job. Refer to Run Your First Remote Job.
Service Logs & Monitoring
-
You can monitor Agent health, location, and job history from the cloud:
- DataConnect Cloud: https://console.im.actiandatacloud.com/ui/agents
- Avalanche Console: https://avalanche.actiandatacloud.com/im/agents
- Private Cloud on Kubernetes: https://[your hosted domain]/ui/agents
noteFor more information on managing agents and devices from the Integration Manager, see Managing Agents and Devices.
-
You can monitor service activity and get important additional information from the log file on the Agent machine (default:
/etc/opt/actian/integration-agent/logs/integration-agent.log).
Start/Stop/Status
Start: sh -x /etc/init.d/agentservice start
Stop: sh -x /etc/init.d/agentservice stop
Status: sh -x /etc/init.d/agentservice status
Uninstalling
yum uninstall integration-agent-3.x.x.noarch.rpm
Log file data will survive uninstallation/reinstallation.
Docker Installation
Integration Agent can be installed using a Docker image via Docker Desktop and Docker CLI.
Prerequisites
- DataConnect Cloud or Avalanche Subscription
- Docker Hub account
- Access to the Actian Docker Hub. Create a New Case to request access to the Actian Docker Hub.
Install Docker Desktop
-
Download Docker Desktop from https://hub.docker.com/.
-
Run the Docker Desktop installer using recommended settings.
-
Launch Docker Desktop and sign in.
-
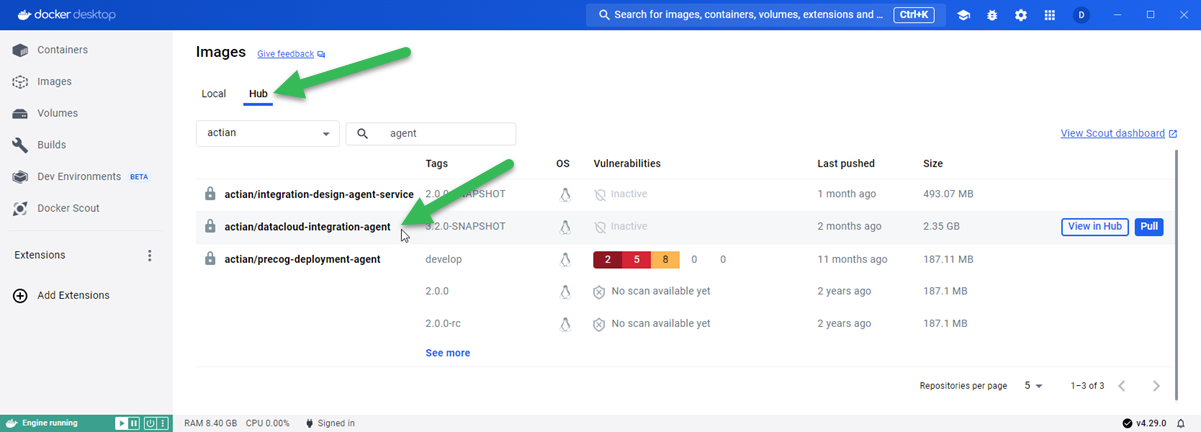
Click the Hub tab.
-
Select actian in the hub dropdown.
-
Enter agent in the search field.
-
Ensure that you have access to the actian/datacloud-integration-agent image:
-
Create the following Docker Compose file with the name
docker-compose.yaml:version: '3.8'
volumes:
job_logs:
conf_props:
agent_log:
license_path:
driver: local
driver_opts:
type: none
device: <path to license file, such as ./src/main/license>
o: bind
services:
agent_service:
image: actian/datacloud-integration-agent:3.2.0-SNAPSHOT
user: root
privileged: true
hostname: im-agent
volumes:
- conf_props:/opt/Actian/conf
- license_path:/opt/Actian/volume
- agent_log:/opt/Actian/logs
- job_logs:/opt/Actian/local/work/job
ports:
- 6001:6001
command: bash -c "tail -f /dev/null" -
Save the
docker-compose.yamlfile to local folder. -
Update the
deviceproperty to point to the path of yourcosmos.slclicense file, relative to the folder containing thedocker-compose.yamlfile. -
The
imagespecified above is3.2.0-SNAPSHOT. You can specify any image listed in the Tags column: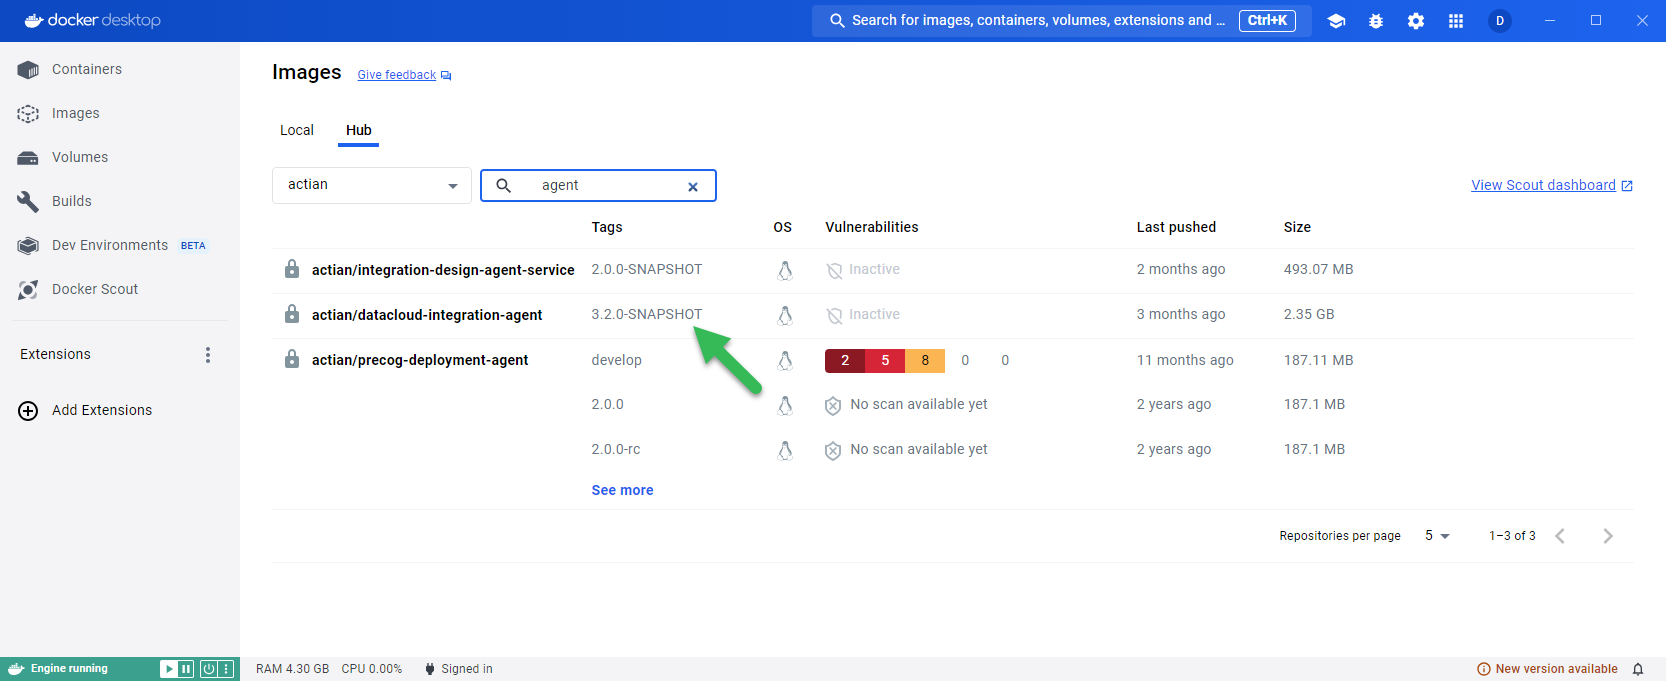 note
noteIf latest is listed for the image, specifying
image: actian/integration-agent:latestwill pull the latest image. -
If desired, you can use a different port. To use port 8085, for example, you would change the above port entry to
8085:8080. -
Open a command prompt and navigate to the folder containing the
docker-compose.yamlfile. -
Run the following command:
docker compose up -
The Agent service should now be running in your Docker container.
Registration
-
Register the Agent using your DataConnect Cloud or Avalanche credentials. Registration progress will be shown to confirm that your Agent is operational.
 note
noteYou can open http://localhost:6001/home at any time to confirm the status of the Agent. Clicking the Check-in button updates the Last Check-In time on the Agents tab in Integration Manager.
-
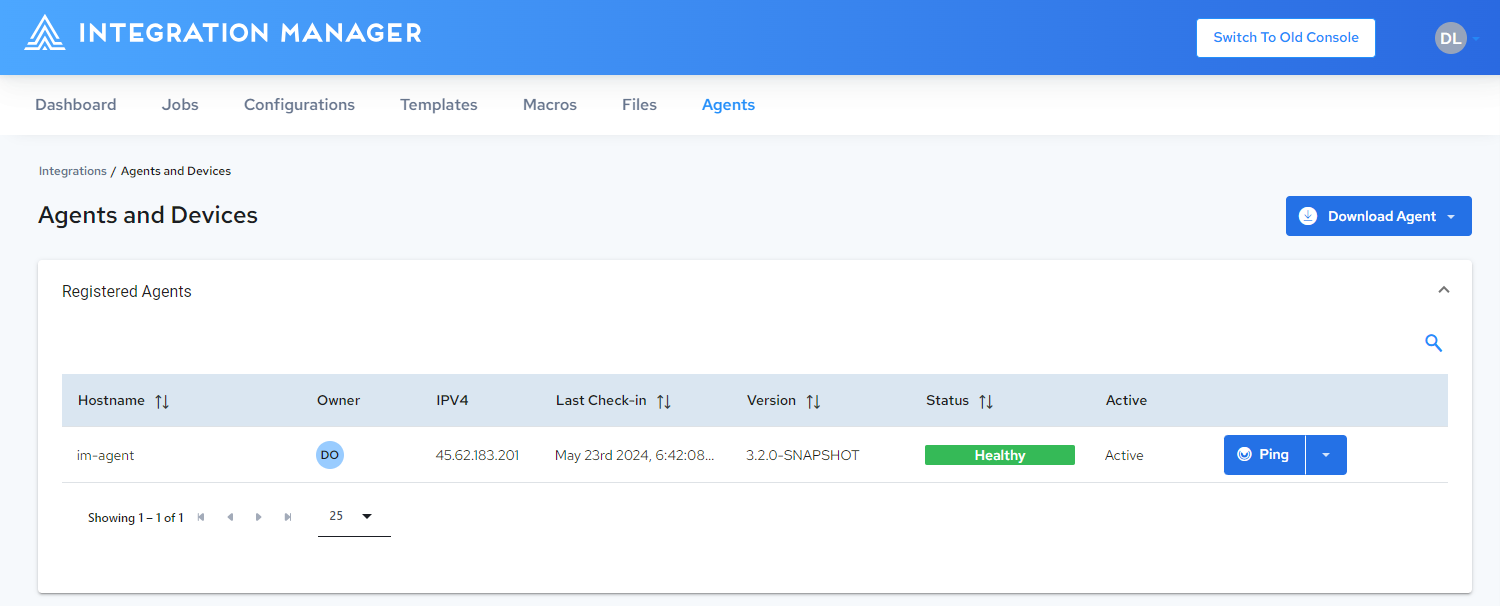
You should now be able to view and manage your Agent from the cloud on the Agents tab in Integration Manager:
If you encounter issues, try the following:
-
Make sure the agent has been activated. See Managing Agents and Devices.
-
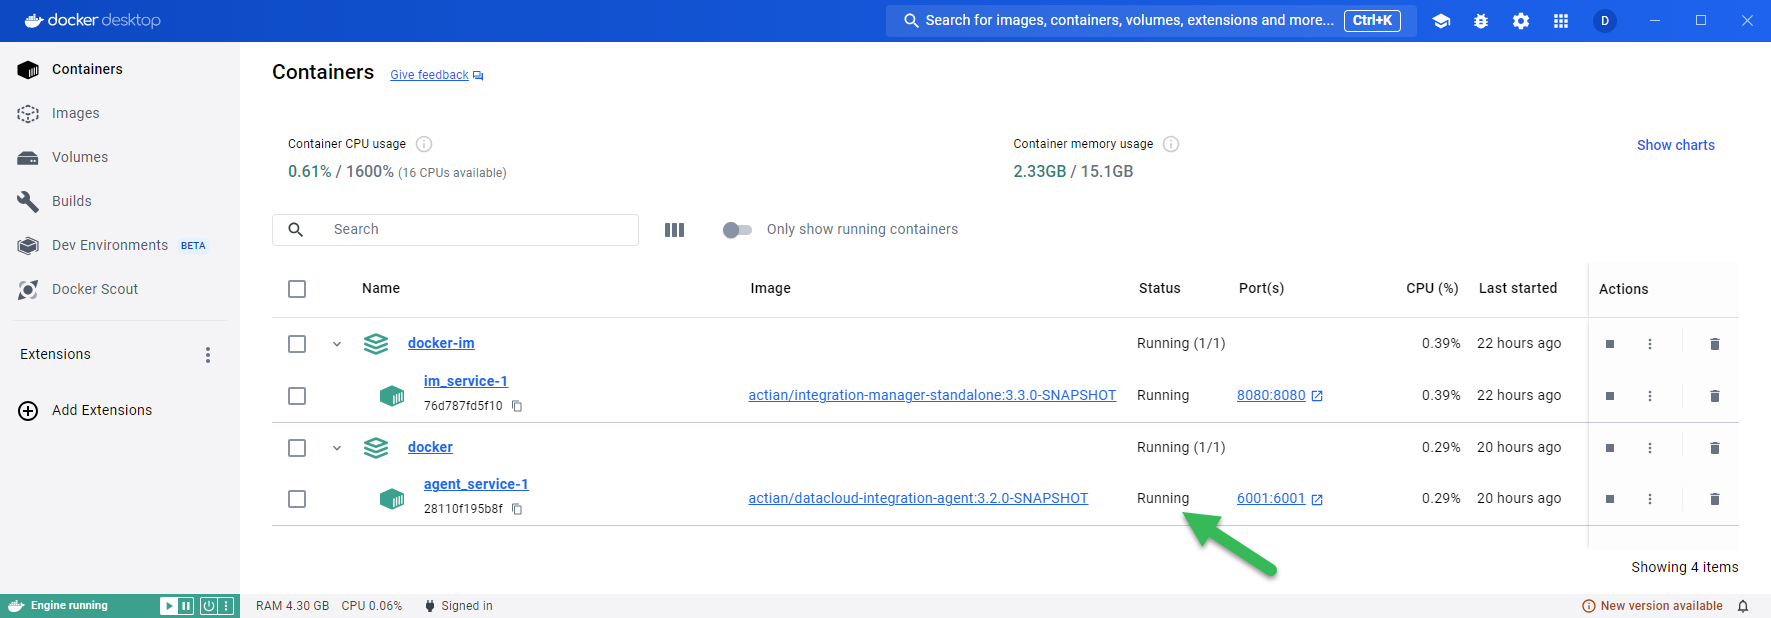
In Docker Desktop, click Containers in the left pane and ensure that the Integration Agent service is running:
-
Refer to Agent Troubleshooting.
Run Your First DJAR
You are now ready to run your first remote job. Refer to Run Your First Remote Job.
Configuration
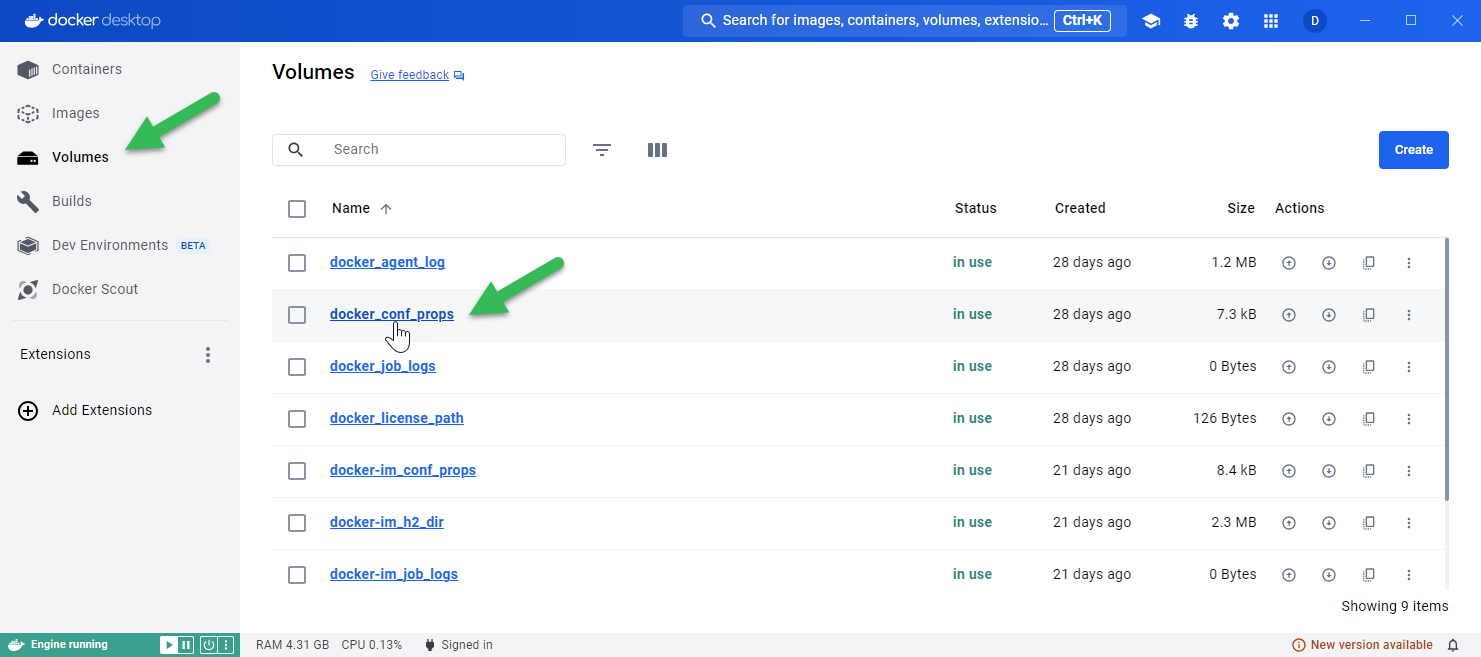
Docker Desktop exposes directories containing configuration files, including the application.properties file, which can be used for a variety of configurations to tailor Integration Manager and Agent to your requirements and environment. See Application Property Reference for a description of available properties.
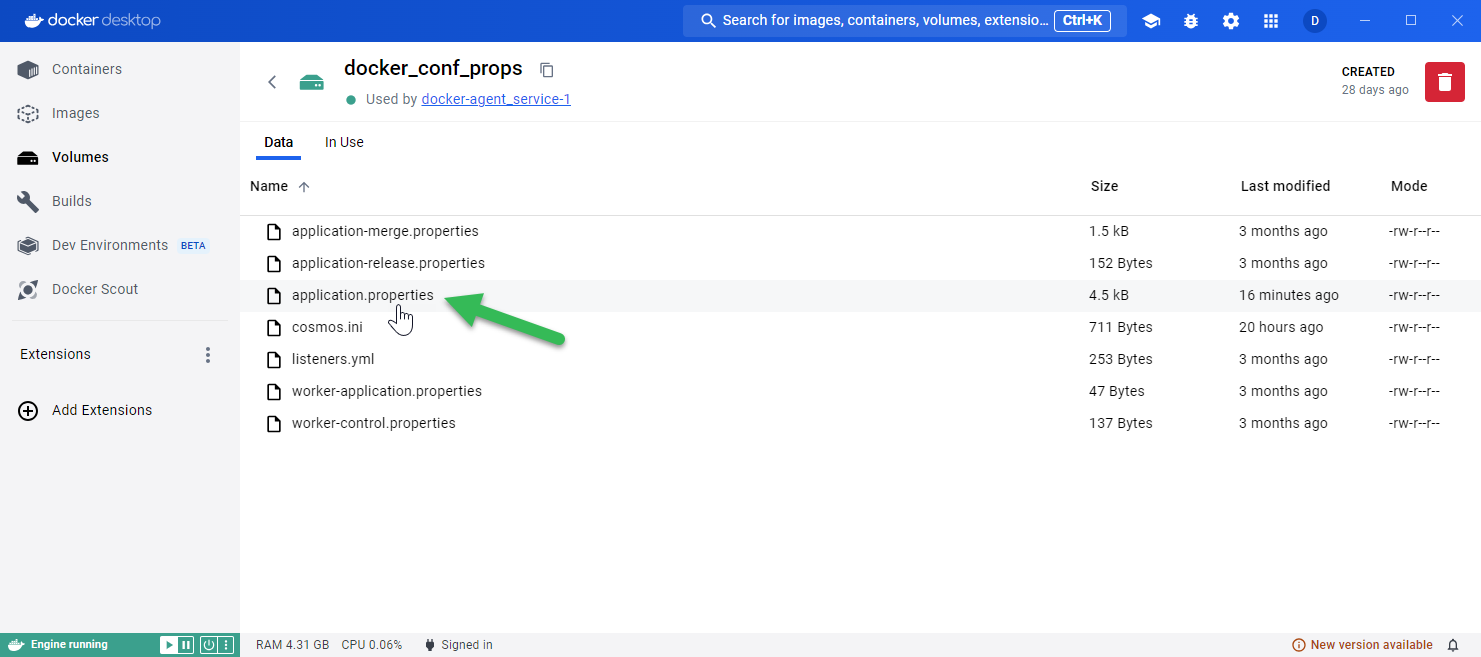
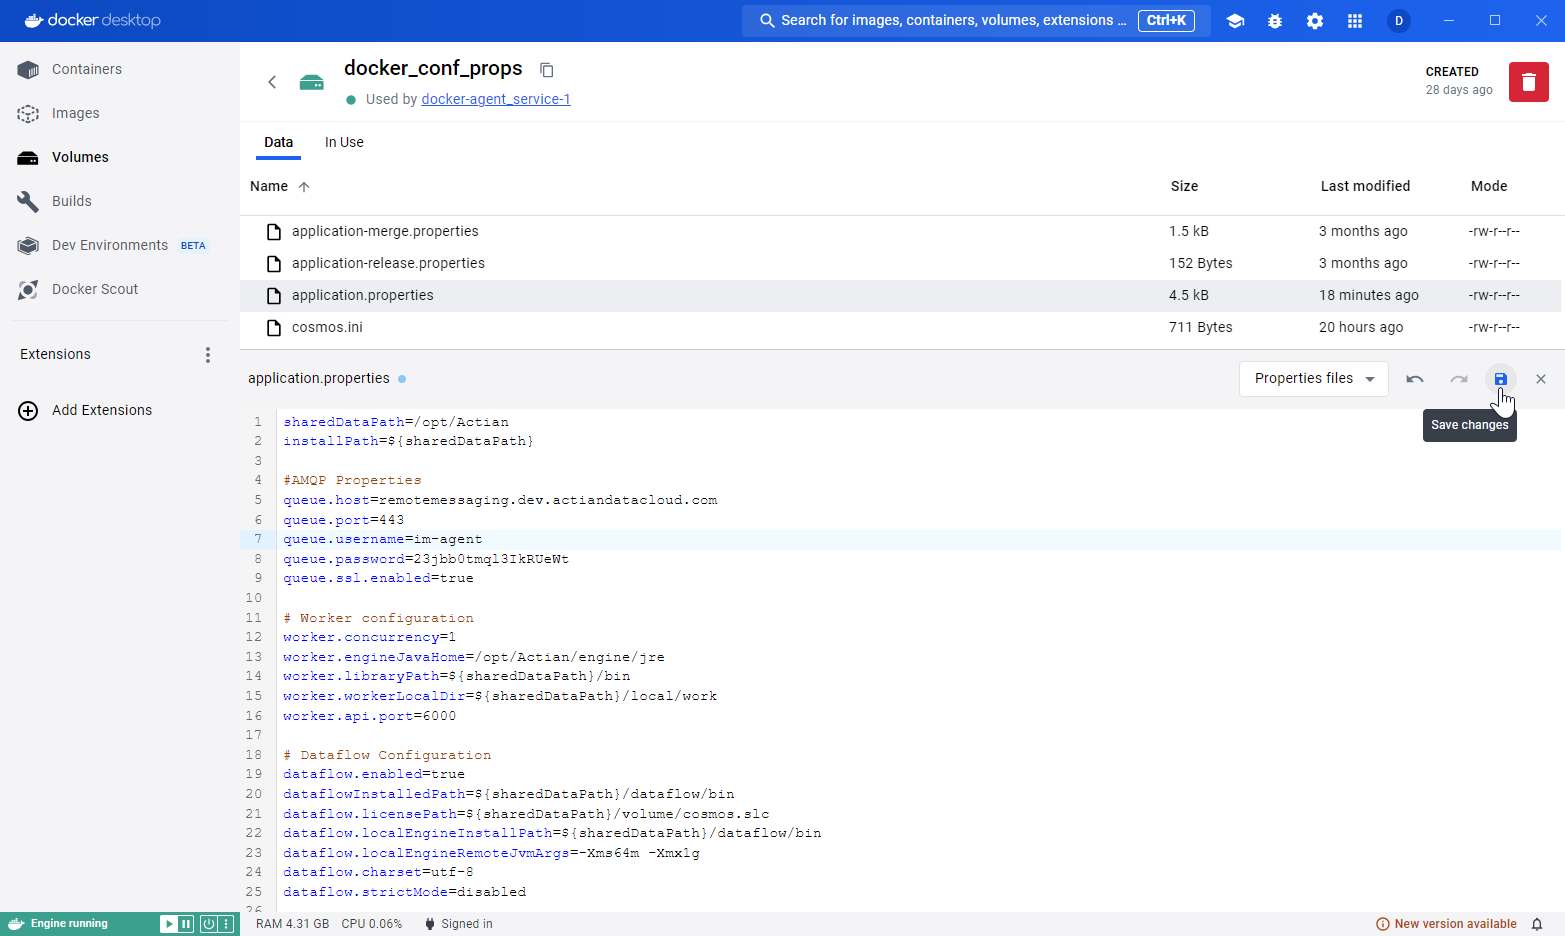
To modify the application.properties file in Docker Desktop, do the following:
-
In Docker Desktop, click Volumes in the left pane, then click docker_conf_props:
-
Double-click application.properties:
-
Make any desired edits, then click the disk icon to save changes.
Service Logs & Monitoring
You can monitor Agent health, location, and job history from the cloud:
-
DataConnect Cloud: https://console.im.actiandatacloud.com/ui/agents
-
Avalanche Console: https://avalanche.actiandatacloud.com/im/agents
-
Private Cloud on Kubernetes: https://[your hosted domain]/ui/agents
noteFor more information on managing agents and devices from the Integration Manager, see Managing Agents and Devices.
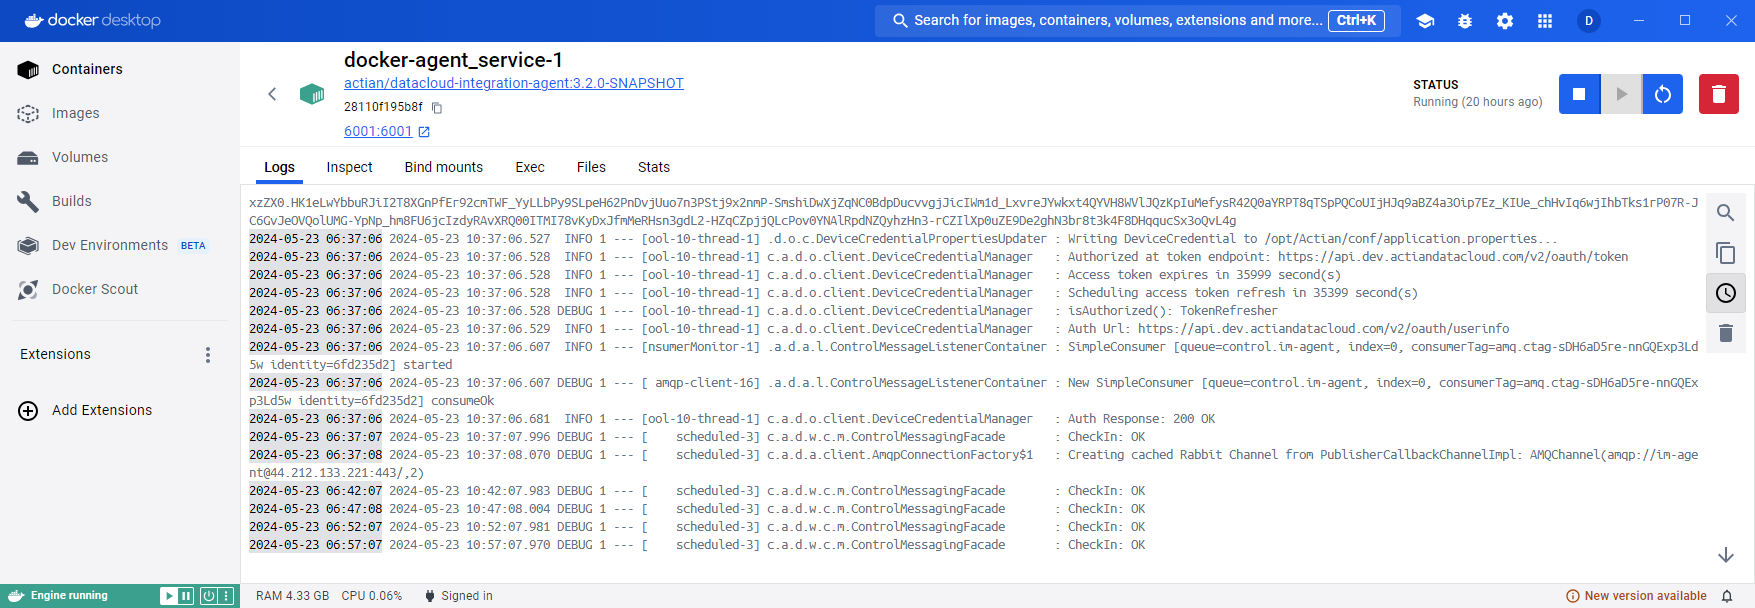
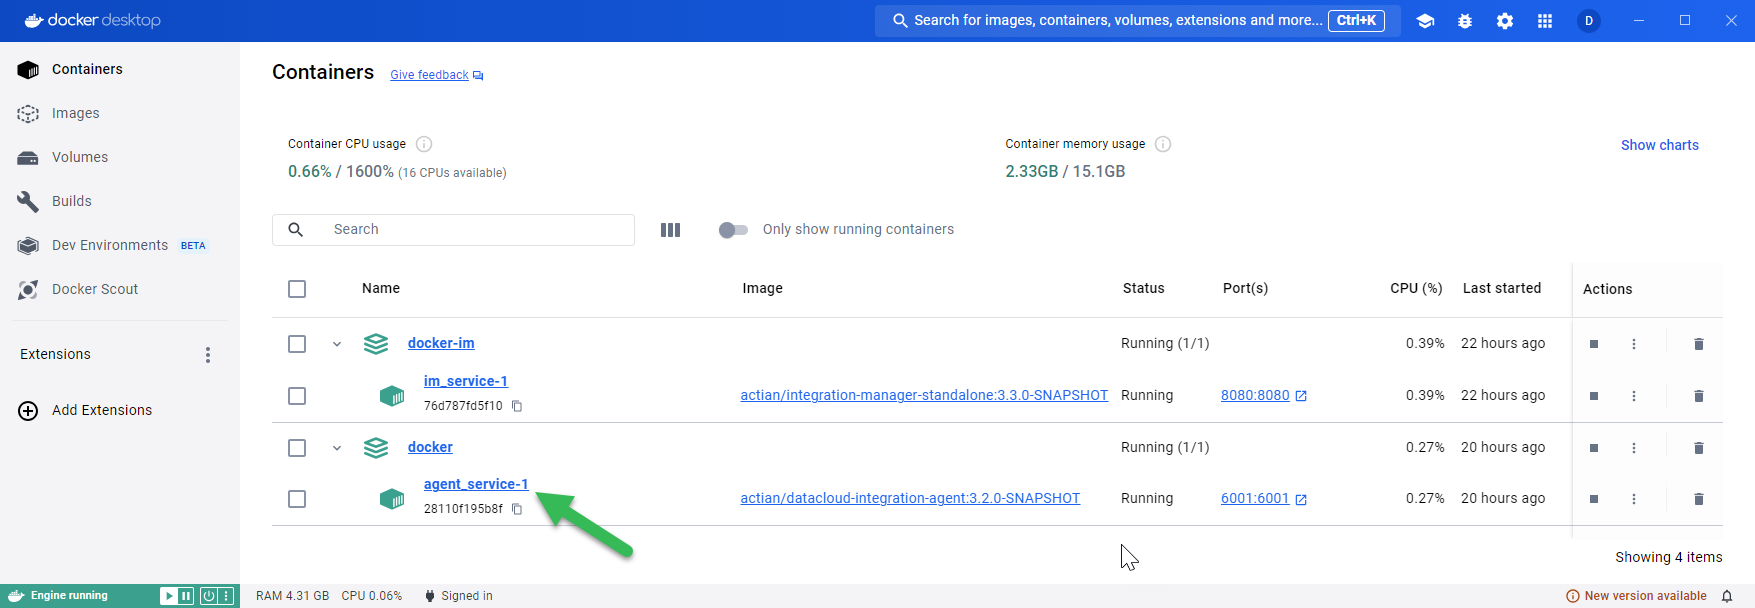
You can monitor service activity and get important additional information from the log file in Docker Desktop. Do the following:
-
In Docker Desktop, click Containers in the left pane.
-
Click the Agent service:
-
The Logs tab is displayed:
